
Blog
Bench Press Without a Spotter: How to Do It Safely
Published October 30, 2026 · 19 min read
You can bench press without a spotter, but only if the equipment does the spotter's job: a power rack or squat stand with safety pins or arms set just below your chest-touch height, a full thumbs-around grip, and a working weight that leaves reps in reserve. If you do not have that setup, the safest answer is to switch to a variation that cannot trap you, such as dumbbells or a floor press.
Most advice on this topic stops at a list of rules. This guide goes a step further: it explains why each rule exists, how to set the pins correctly, how to rehearse a failed rep before you ever need one, and how to choose loads so that failure is rare in the first place.
TL;DR
- Bench alone only inside a rack with safety pins or arms, set so the bar touches your chest but rests on the safeties if you relax your body.
- Never bench heavy on a Smith machine or a free-standing bench with no catch points, because a missed rep can pin you under the bar.
- Use a full thumbs-around grip, load the plates evenly, and rehearse your bail-out with an empty bar before working sets.
- Stop sets with at least one or two reps in reserve when you train alone, and keep true failure for dumbbells, machines or days with a partner.
- If no safe setup exists, swap in dumbbell bench, floor press or push-up variations and keep progressing.
Table of Contents
- Is it okay to bench press without a spotter?
- What actually goes wrong when you bench alone
- Set up the rack so it catches the bar
- Equipment: what works and what does not
- Grip, collars and loading
- How to fail a rep without a spotter
- Choose weights that keep failure off the table
- Safer variations when no rack is available
- Our perspective
- Keep your solo bench log honest
- A pre-set checklist for benching alone
- Frequently asked questions
- Sources
Is it okay to bench press without a spotter?
It is acceptable when your setup makes a failed rep harmless, and it is risky when it does not. Mainstream guidance leans cautious: WebMD's bench press guide says to always have a spotter and not to bench alone. That is a sensible default for anyone with no rack, no safeties or little experience.
The reality is that most lifters train alone at least some of the time, at home, in an early-morning gym or in a garage. The question that matters is therefore not "spotter or no spotter" but "what will catch the bar if I miss?" A person is a spotter. So is a pair of steel pins at the right height. The bench press is dangerous mainly because the bar sits over your chest and throat, and because a lifter who fails cannot easily move out from under it.
That is why the first decision is about equipment, not willpower. If the answer to "what catches the bar?" is "nothing" or "my arms, probably," do not bench heavy. If the answer is "two adjustable safeties I have tested," you are in a very different position.
One point from the sports medicine literature is worth knowing. In a review of the bench press in the ACSM's Health and Fitness Journal, the authors note that, unlike explosive lifts, the barbell bench press suits direct spotting because the bar moves over the head and face and the risk to the spotter is minimal (The Bench Press Exercise, ACSM Health & Fitness Journal, 2018). In other words, a good human spotter is genuinely useful. Solo lifting is a trade you make when you cannot get one, and the rest of this article is about making that trade as cheap as possible.
What actually goes wrong when you bench alone
Understanding the failure modes makes the rules easier to remember.
- The bar stalls on your chest. You lowered it under control, but the press does not come back. Without a catch, the weight sits on your sternum and you cannot breathe well enough to wriggle out.
- The bar stalls halfway up. This is less dangerous with safeties, because you can lower it to the pins. Without them, you are holding a loaded bar over your face with fading arms.
- One side fails first. An uneven fatigue pattern tips the bar, and plates slide off if collars are in place or the load is uneven.
- The setup fails. The pins were set too low, the bench was not under the bar, or the bar was racked off-center.
Each rule that follows addresses one of those four.
Set up the rack so it catches the bar
The single most important piece of the solo bench is the position of the safeties. Get it wrong and the rack becomes decoration.
Step 1: Place the bench under the bar
Slide the bench into the rack so your eyes sit directly under the bar when you lie back. That puts the bar over your shoulders and upper chest, where the unrack is shortest and most stable. Rack setup guidance from Megastar Fitness also suggests marking the bench position on the floor with tape or chalk so you land in the same place every session. It sounds minor, but a bench that drifts by two inches changes your bar path and your pin height without you noticing.
Step 2: Set the safeties just below chest-touch height
The pins or arms must be low enough that the bar can touch your chest during a proper rep, and high enough that if you relax your body the bar lands on them instead of on you. The rack guide above describes setting them just below your chest height when you are arched, so that the bar rests on the safeties if you let go. A hands-on home-gym guide puts the target more specifically: about half an inch to an inch below the bar at your chest touch point with your arch set (How to Bench Press at Home Without a Spotter, Apex Fitness).
Because the rack holes come in fixed increments, you usually have to choose the hole just below your touch point. Never pick the one above it, which would block your range of motion and tempt you to shorten reps.
Step 3: Test the height with an empty bar
Before you load any plates, lie on the bench in your normal setup, arch as you would for a working set and lower the empty bar to your chest. Then deliberately relax your torso, flatten the arch and let the bar settle. Confirm two things: the bar touches your chest in a normal rep, and it comes to rest on the pins when you release the arch (the same safety-height test is described by Sport-Calculator). If your chest touches the bar while it is sitting on the pins, they are too high for you to bail safely. If there is a visible gap of several inches between bar and pins at the bottom, they are too low.
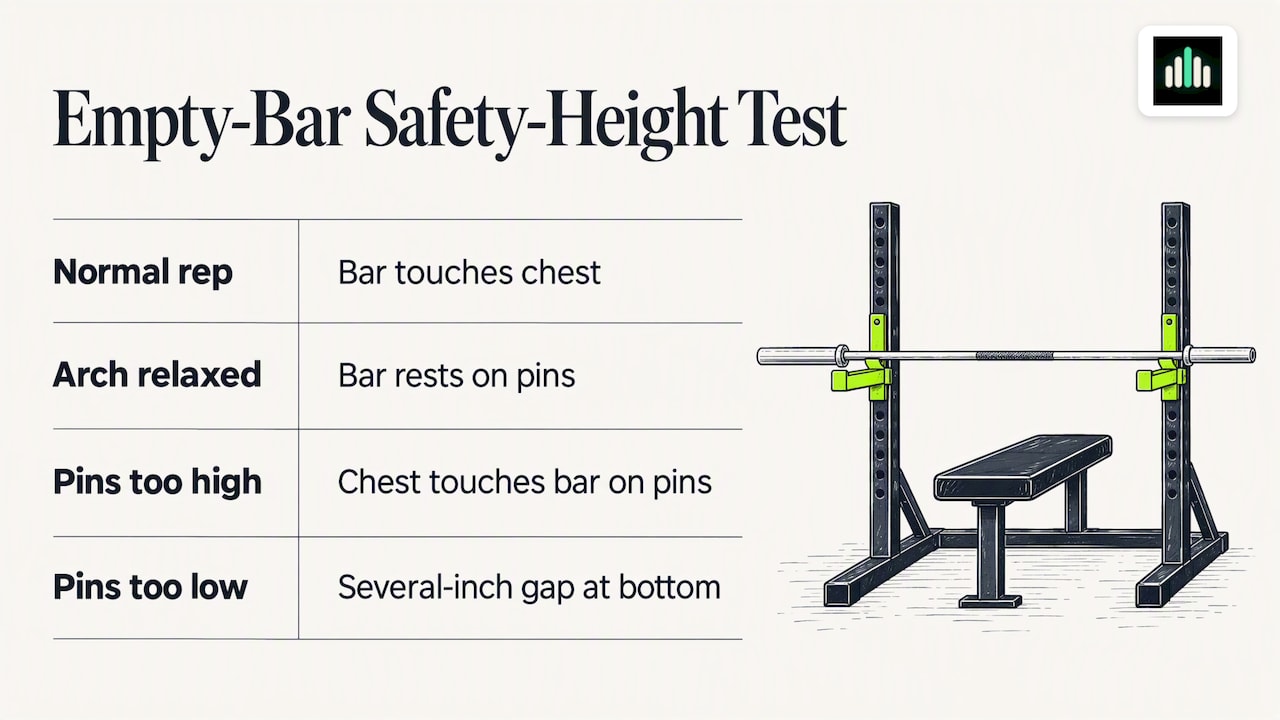
Check the height every time you change your arch, your bench or your shoes. A few seconds of testing is cheaper than finding out under load.
Step 4: Check both sides match
Both safeties must sit in the same-numbered holes. It is easy to misread a hole and end up with one side two inches lower, which tilts the bar when it lands. Read the numbers on each upright aloud if you have to.
Equipment: what works and what does not
Not every setup that looks safe is safe. This table compares common options for a lifter training alone.
| Setup | Safe to bench heavy alone? | Why |
|---|---|---|
| Power rack with adjustable pins or arms | Yes, when tested | Bar lands on steel at a height you chose |
| Squat stand with adjustable spotter arms | Yes, when tested | Same principle, but check that the stand cannot tip |
| Free-standing bench and stands with no safeties | No | Nothing catches the bar if you fail |
| Smith machine | Not recommended | Fixed rails can trap you and make it hard to release the weight |
| Dumbbells | Yes, with sensible loads | You can drop them to the sides |
| Floor press | Yes, with a rack or dumbbells | Floor limits your range and acts as a stop |
A power rack with safety pins or a squat stand with adjustable spotter arms is the standard recommendation for solo benching (Testify Strength & Conditioning). The Smith machine surprises many people, because it feels safer. The problem is that its fixed track can entrap a lifter and make it difficult to rack the bar or release the weight if a rep fails, and you have to rotate the bar to hooks that you may not be able to reach (The Art of Manliness, on bench pressing without a spotter). Some Smith machines have adjustable stops, which help, but the first question remains whether you can get out if the bar is on your chest.
Grip, collars and loading
Wrap your thumbs around the bar
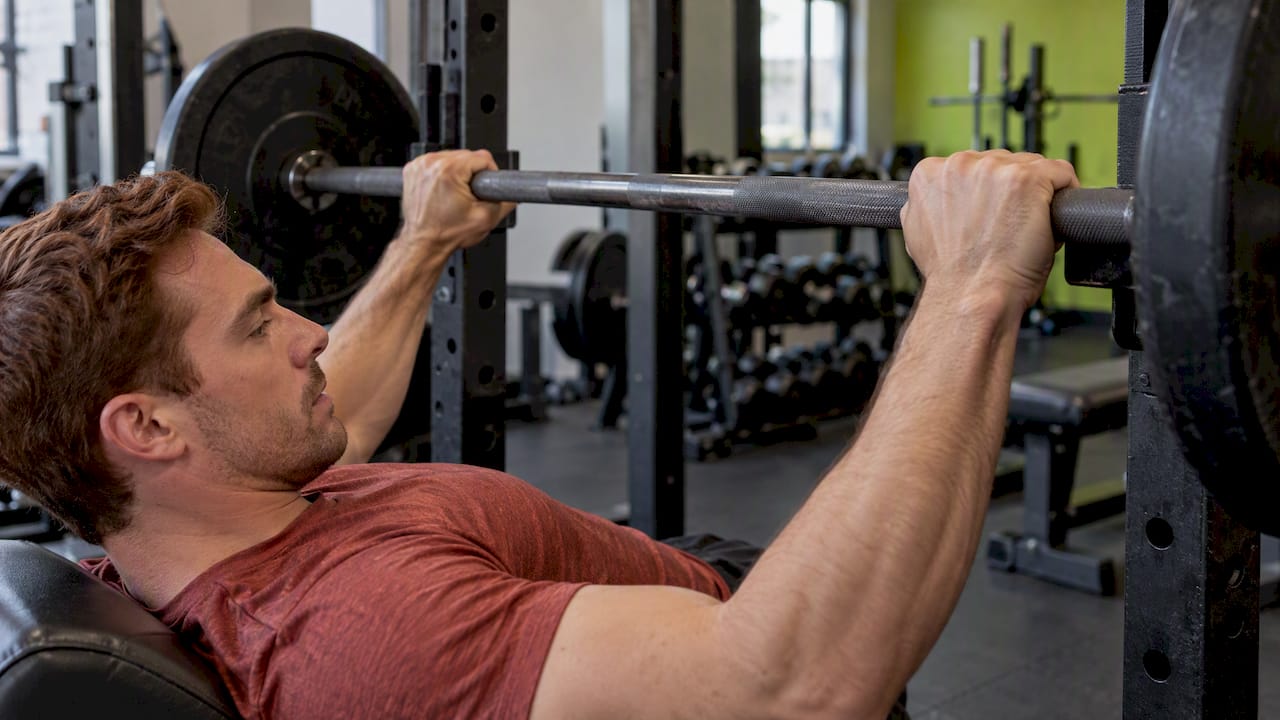
The thumbless grip, sometimes called a suicide grip, lets the bar roll out of your hands more easily, and the bar then lands on your chest or face. Use a full grip with the thumbs wrapped around the bar on every set, and especially when you are alone. This is a consistent safety recommendation across coaching guides (Art of Manliness). It also helps you generate force because your wrists stay stacked over your forearms.
Load plates evenly and check the sleeves
Put the same plates on both sides, in the same order, and seat them fully. An uneven load is an invitation for the bar to tilt as you tire, and the result is a bar sliding sideways off the rack or off your chest.
Collars: a judgment call you should understand
Some solo-training guides tell you never to use collars when benching alone. The logic is that if you fail and tip the bar, the plates can slide off one side and the bar then rolls back up, which lets you escape, although the plates may crash and the other side may then flip. That approach works only when the bar is on safeties and stays level, and it is a risky emergency method rather than a way to train. As a practice rather than a research finding, our advice is simpler: if you set pins correctly, you should not need to dump plates, and using collars keeps the load consistent when your rack setup is good. Whatever you choose, never rely on dumping plates as your main plan.
Unrack and lift-off with care
The point where many shoulder strains happen is at the beginning and end of the set, when you take the bar out of the hooks or put it back. The ACSM review notes that a lift-off from a spotter may reduce the likelihood of shoulder injury during removal and return of the bar (ACSM Health & Fitness Journal, 2018). When you train alone, you have no lift-off, so set the hooks at a height where you can unrack without your shoulder blades coming off the bench. If you have to reach to unrack, lower the hooks by a hole or two.
How to fail a rep without a spotter
If the bar stops moving up, do not fight it for several seconds. Fighting is how a stalled rep becomes a pinned rep. Decide the moment the bar slows to a crawl that the set is over.
- Stop pressing and keep the bar over your chest.
- Relax your arch and flatten your back to the bench, which lowers the bar onto the safeties. This is exactly what the pin-height test above prepares you for (Apex Fitness).
- Once the bar rests on the pins, shimmy out sideways or slide down toward the foot of the bench.
- Unload the bar one side at a time only after you are out and standing. Take the plate off the same side you are on to avoid tipping.
The old "roll of shame" is a last resort for lifters with no safeties: you let the bar roll down your torso to your hips and sit up. It works for lighter loads, but it is awkward and can hurt the abdomen or hips, and it is no substitute for pins. If you ever plan to use it, practice it with an empty bar first, as Sport-Calculator recommends, so that your reaction is automatic.
Practice the bail-out before you need it
Once per training block, run a rehearsal. Load only the bar, or the bar with a light plate on each side, lower it to your chest, relax and let it settle on the pins, and shimmy out. Do it two or three times. Nothing about the first real miss will feel calm, so you want your hands and hips to know the route already.
Choose weights that keep failure off the table
The best way to fail safely is to fail rarely. Solo benching rewards submaximal training, because the most dangerous sets are the ones where you push to your absolute limit with no one to help.
Use reps in reserve to set the stopping point
Reps in reserve (RIR) is the number of good reps you could still complete when you stop. If you finish a set and feel you could have done two more with the same form, that set was at 2 RIR. For solo bench work, a practical rule is to end most working sets at 1 to 3 RIR and to keep sets at 0 RIR for dumbbells, machines or training with a partner. This is a coaching practice, not a research prescription, but it follows from the logic of the setup: with pins, a miss is survivable, and without a miss you never have to find out.
A worked example: you bench 185 pounds for 8 reps and the last rep was slow but clean. You judge that you had one rep left. That was a set at 1 RIR. If your target was 2 RIR, you would lower the weight a little next time, perhaps 5 pounds, so that the same 8 reps leave a rep or two in the tank. Over several weeks that approach lets you add load without a single grinding miss.
The hard part is that people misjudge their RIR, especially on a set where reps slow dramatically. Logging the weight, reps and your RIR rating every set helps you see how your estimates match what actually happens. If a set you rated 3 RIR comes out as a grind, your rating was too generous and you should lower the next set's weight.
Build skill and control first
If you are new to the barbell bench, spend a few weeks under light loads. A paper in the ACSM's Health and Fitness Journal on the YMCA bench press test advises that novices should demonstrate proper technique and control with an unloaded or lightly loaded bar before adding weight, and should be screened for injuries (Ronai, ACSM Health & Fitness Journal, 2020). Tracking how hard each set feels also builds the judgment you need later; effort tracking metrics are a useful way to see whether your control is improving before the numbers climb.
When you miss, lower the load
If you miss a rep, the answer is almost never to try the same weight again that day. Reduce the load, finish your sets with clean reps, and adjust your next session so the same work lands a rep or two easier. Repeated struggle against failed reps teaches nothing that submaximal reps do not.
Safer variations when no rack is available
If your gym is crowded, you are traveling or you train in a space with a bench but no rack, you do not have to skip chest day. You have three solid options.
- Dumbbell bench press. You can drop the dumbbells to your sides if you run out of strength, which makes it the simplest solo alternative. Our guide to dumbbell bench press form and weight covers how to get them into position without straining your shoulders, and a dumbbell bench press calculator can help you estimate a starting load per hand.
- Dumbbell floor press. The floor stops your elbows and shortens the range, and you can lower the weights to the ground. See dumbbell floor press form and benefits.
- Other swaps. If you have a particular piece of equipment, there are bench press alternatives by equipment that keep chest, shoulders and triceps progressing without a barbell over your face.
Some coaches also point out that dumbbells are a reasonable choice when training heavy alone because they can be dropped to the sides (Sport-Calculator). The trade-off is setup: getting heavy dumbbells into position takes practice, and you should lower them with control rather than letting them slam.
Our perspective
We build a training tool, and we see one pattern again and again in logged lifting data: the scary bench press moments rarely come from one bad rep. They come from a gradual drift in how hard sets feel, where a weight that once left three reps in reserve slowly turns into a grinder because sleep, stress or a poor warm-up changed the day.
That is why we think of solo bench safety as two layers. The first layer is physical: rack, pins, grip, even loading. The second is informational: knowing, set by set, how close to failure you really are. Most lifters invest in the first and ignore the second. If you write down weight, reps and a reps-in-reserve number every set, your last few sessions tell you whether tonight's planned load is still sensible before the bar is even loaded.
When the data says today is a heavier-feeling day, the right response is to take weight off and keep the reps clean, not to prove something. Progress comes from stacking sessions you can repeat. A bench you can walk away from is a bench you can keep training.
— Guilherme
Keep your solo bench log honest
Safe solo training depends on your ability to judge effort, and judging effort depends on having records to compare against. RIRLift lets you log every set with weight, reps and RIR on iPhone or Apple Watch, and its Coach, the AI Coach, uses those logs to suggest your next load so you are less likely to guess too heavy on a day you are alone. Core logging is free, and Pro is $9.99 per month or $79.99 per year. You can start at RIRLift.
A pre-set checklist for benching alone
Run through these in order before each working set. It takes less than a minute once it is routine.
- Bench aligned under the bar, eyes beneath it, floor marking matches.
- Safeties in matching holes, just below your chest-touch point when arched.
- Bar test done at the start of the session with the arch released.
- Plates loaded evenly and seated.
- Thumbs wrapped around the bar.
- Target for the set is 1 to 3 RIR, not failure.
- Your exit route is clear: no dumbbells, plates or bags blocking the sides.
- Phone or gym staff nearby if you train in a space where someone can hear you.
That last point is worth emphasizing for garage lifters. A safety guide for home gyms calls the bench press the most dangerous barbell lift to do alone and advises against benching heavy without at least one safety measure in place (GarageGymBuilders). Layering protections, such as pins and a reachable phone, is better than relying on one.
Frequently asked questions
Is it okay to bench without a spotter?
It can be, if you bench inside a rack with safety pins or arms set just below your chest-touch height and you stop sets short of failure. Without safeties, you should not bench heavy alone. When in doubt, use dumbbells or a floor press.
How do you fail a bench press without a spotter?
Stop the moment the bar slows to a crawl, flatten your arch and lower the bar onto the safety pins, then shimmy out from under it. Practice the move with an empty bar so it feels automatic. Do not wrestle with a stuck bar for several seconds.
Is the Smith machine safer for solo benching?
Usually not. Its fixed rails can trap you under the bar and make it hard to rotate the hooks and rack it if a rep fails. A power rack with adjustable safeties is a better choice for barbell work.
What weight should you use when benching alone?
Choose a load that leaves one to three reps in reserve on most sets, and save sets taken to failure for dumbbells, machines or sessions with a partner. If a set you expected to be easy grinds, lower the next set rather than repeating the weight.
Sources
- How to Bench Press, WebMD
- The Bench Press Exercise, ACSM Health & Fitness Journal (2018)
- The YMCA Bench Press Test, ACSM Health & Fitness Journal (2020)
- How To Use The Power Rack: A Beginner's Guide, Megastar Fitness
- How to Bench Press at Home Without a Spotter, Apex Fitness
- How to Safely Bench Press Alone, Testify Strength & Conditioning
- Bench Press Safety: Spotting and Solo Training Guide, Sport-Calculator
- Bench Pressing With No Spotter: 4 Rules, The Art of Manliness
- Garage Gym Safety Guide: Training Alone Safely, GarageGymBuilders
- Athlete Effort Tracking: 3 Metrics Coaches Can Start Using This Week