Bodyweight exercises for seniors: strength with no equipment

The best bodyweight exercises for seniors are the squat to a chair, wall sit and single-leg calf raise for the legs; the incline push-up against a counter and the kneeling push-up for the upper body; clamshells, side leg raises and donkey kicks for the hips; and the dead bug, plank, side plank and superman for the trunk and back. Do 5 or 6 of them two or three times a week, 2 to 3 sets each, and stop with 2 or 3 reps left. Make them harder by slowing down, going lower, or moving to the next version, not by doing endless reps.

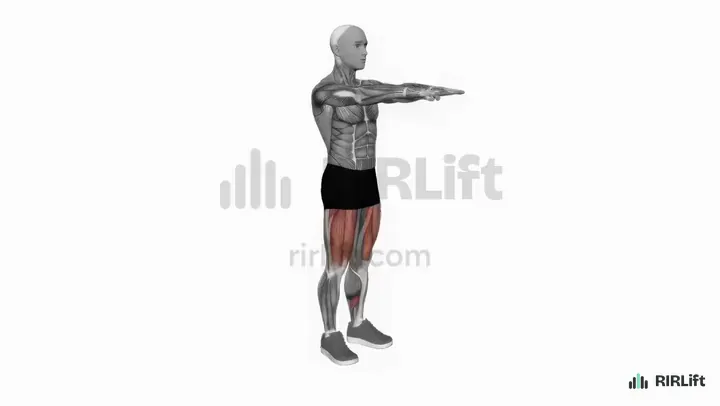
  1. Bodyweight Squat Quads
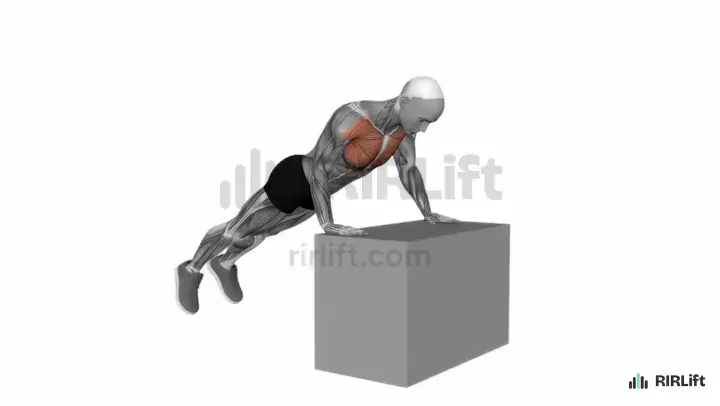
  2. Incline Push-Up Chest
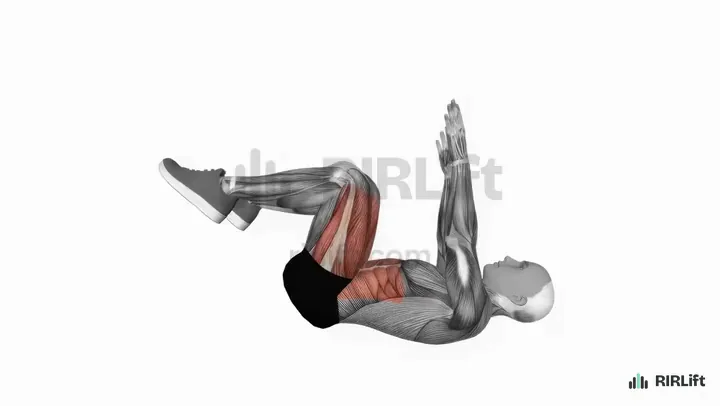
  3. Dead Bug Abs
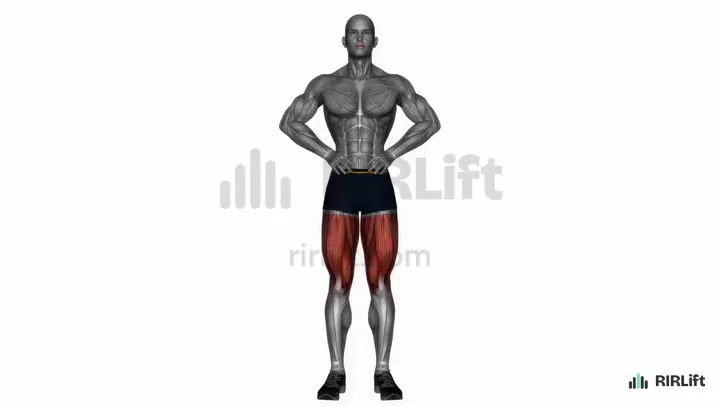
  4. Standing Side Leg Raise Abductors
  5. Single-Leg Calf Raise Calves
  6. Superman Lower Back
  7. Plank Abs
  8. Clamshell Abductors

Legs: standing up and walking

Your legs carry your body all day, so body weight is already a real load for them. Squat to a chair for standing up, hold a wall sit for strength in a fixed position, and raise onto one foot for the calf strength behind each step.

Quads and glutes, squat

Bodyweight Squat

Quads

With nothing to hold, the squat is all about controlling your own weight down and up. Touch a chair at the bottom to start, then hover above it, then squat below it as your strength and confidence grow.

How to do it

  1. Stand with your feet about shoulder-width apart, toes turned out slightly, arms out in front for balance.
  2. Push your hips back and bend your knees, keeping your heels flat and your chest up.
  3. Lower until your thighs are at least parallel to the floor, deeper if your heels stay down.
  4. Drive through your whole foot to stand tall, then go straight into the next rep.

Cues

  • Heels glued to the floor
  • Knees over toes
  • Thighs to parallel or lower

Common mistakes

  • Knees caving in on the way up: push them out over your little toes.
  • Quarter squats to hit a rep count: a full-depth set of 12 beats a shallow set of 30.

Swap for: Reverse Lunge, Wall Sit, Jump Squat

Quads, wall hold

Wall Sit

Quads

With your back against a wall, the wall sit trains the thighs while you stay still and supported. Choose the depth you can hold for 15 to 30 seconds and go a little lower each week.

How to do it

  1. Lean your back on a wall with your feet roughly two feet out from it.
  2. Slide down until your thighs are close to parallel with the floor.
  3. Keep your knees over your ankles and press your back into the wall.
  4. Hold the position for the target time, then slide back up.

Cues

  • Thighs level
  • Press the heels
  • Back flat on the wall

Common mistakes

  • Feet too close: the knees end up past the toes.
  • Resting hands on the thighs: keep them off your legs.

Swap for: Bodyweight Squat, Cossack Squat

Calves, one leg

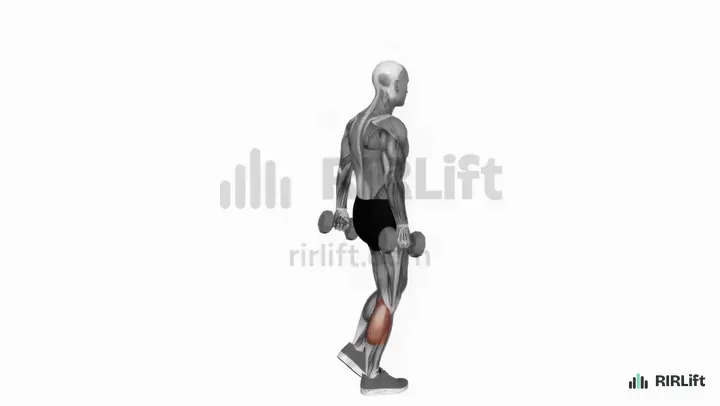
Single-Leg Calf Raise

Calves

Body weight on one foot is a real calf load, and the step lets the heel drop for a full range. Hold a rail or wall with one hand so balance never cuts the set short.

How to do it

  1. Stand on one foot with the other lifted just off the floor, arms by your sides; hold a dumbbell in each hand once body weight is easy.
  2. Rise onto the ball of your foot as high as you can and hold for a second.
  3. Lower your heel to the floor over two seconds.
  4. Finish all reps on one leg, then switch; sets are per leg.

Cues

  • Rise as high as you can
  • Pause at the top
  • Two seconds down

Common mistakes

  • Bouncing through the reps: pause for a beat at the top of each one.
  • Rolling onto the outside of the foot: keep your weight over the big toe.

Swap for: Dumbbell Standing Calf Raise, Kettlebell Calf Raise, Standing Calf Raise

Hips and glutes

These three work the hip muscles from the side and from behind, lying, standing and on all fours. Choose the position that suits your knees and balance.

Outer hip, lying

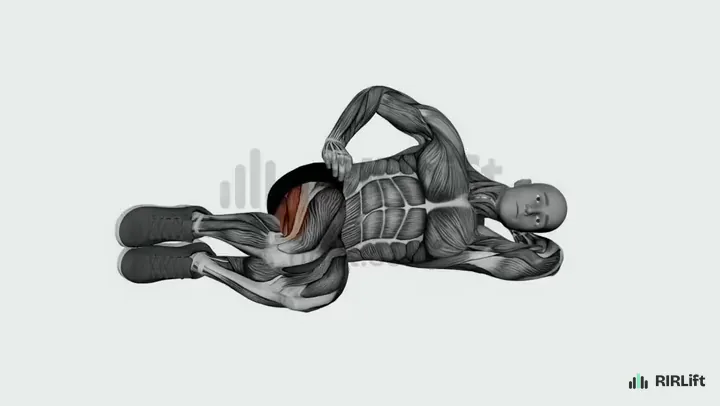
Clamshell

Abductors

Lying on your side takes balance out of the exercise entirely, so the outer hip can work hard even on unsteady days. Slow, full lifts are the key, not speed.

How to do it

  1. Lie on one hip with knees bent, stacked, heels touching.
  2. Pillow your head on the lower arm; keep the hips stacked.
  3. Keep your feet touching and lift the top knee as high as you can.
  4. Lower the knee slowly back to the other one.

Cues

  • Feet together
  • Hips stacked
  • Pause up top

Common mistakes

  • Rolling the top hip back: only the knee should move.
  • Rushing the reps: a two-second lowering makes a light move useful.

Swap for: Fire Hydrant, Standing Side Leg Raise

Outer hip, standing

Standing Side Leg Raise

Abductors

Standing on one leg and lifting the other out to the side trains both hips at once, one moving and one holding you up. A fingertip on the counter is enough support.

How to do it

  1. Stand tall, feet under your hips, hands resting on your hips.
  2. Keep the outer leg straight with the toes pointing forward.
  3. Lift it out to the side without leaning your torso away.
  4. Lower slowly until the foot almost touches the floor.

Cues

  • Toes forward
  • Stay tall
  • Slow lower

Common mistakes

  • Turning the toes up: that shifts the work to the front of the hip.
  • Leaning sideways: lift only as high as you can with an upright body.

Swap for: Fire Hydrant, Clamshell

Glutes, on all fours

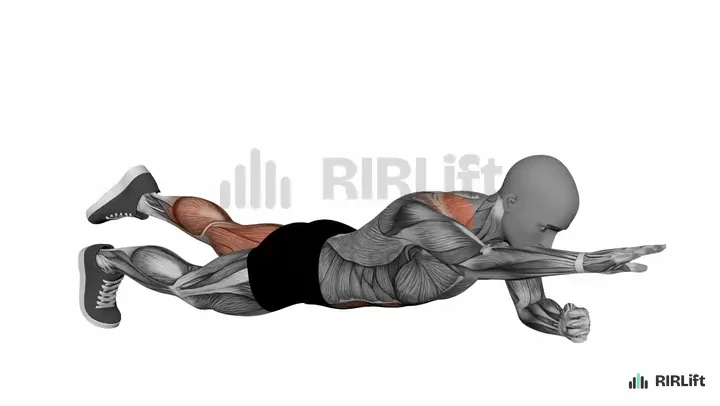
Donkey Kick

Glutes

On hands and knees, lifting one bent leg toward the ceiling works the glutes without loading your back. If kneeling hurts, put a folded towel or pillow under your knees.

How to do it

  1. Get on hands and knees with your wrists under your shoulders and knees under your hips.
  2. Keep one knee bent at a right angle and lift that foot toward the ceiling.
  3. Stop when your thigh is level with your back and squeeze for a second.
  4. Lower the knee back under your hip without touching the floor, finish the set, then switch legs.

Cues

  • Foot to the ceiling
  • Flat back
  • Squeeze at the top

Common mistakes

  • Arching your lower back to kick higher: the lift should come from your hip.
  • Swinging the leg: if momentum is moving it, slow down and pause at the top.

Swap for: Band Glute Kickback, Fire Hydrant, Dumbbell Glute Bridge

Push-ups from the wall to the floor

A push-up against a wall, counter, bench or the floor from your knees is the same exercise at different difficulty. Start where you can do 8 good reps and move lower as you get stronger.

Chest, shoulders and triceps, incline

Incline Push-Up

Chest

Pushing away from a counter or bench is the most adjustable upper-body exercise there is: the higher the surface, the easier it is. A kitchen counter is a good start for most people.

How to do it

  1. Put your hands on a bench, box or counter, a little wider than shoulder width.
  2. Walk your feet back until your body is a straight line from head to heels.
  3. Lower your chest to the edge, elbows angled about 45 degrees from your sides.
  4. Press back up until your arms are straight.

Cues

  • Body like a plank
  • Elbows at about 45 degrees
  • Higher surface, easier rep

Common mistakes

  • Hips sagging toward the floor: squeeze your glutes and brace as if you were about to be poked in the stomach.
  • Flaring the elbows straight out: tuck them back at about 45 degrees.

Swap for: Kneeling Push-Up, Close-Grip Push-Up, Bench Dip

Chest, shoulders and triceps, from the knees

Kneeling Push-Up

Chest

Once a low bench feels easy, the kneeling push-up brings you to the floor with less of your weight to press than a full push-up. It is the step before full push-ups.

How to do it

  1. Kneel on a mat with your hands on the floor slightly wider than your shoulders and walk them forward until your body is a straight line from knees to head.
  2. Brace your abs and tuck your hips so your back stays flat.
  3. Lower your chest toward the floor between your hands, elbows angled back.
  4. Push back up to straight arms and repeat.

Cues

  • Straight line from knees to head
  • Chest leads, hips follow
  • Full lockout at the top

Common mistakes

  • Bending at the hips so your bottom sticks up: that shortens the range. Keep the line from knees to shoulders.
  • Dropping the head toward the floor before the chest: look slightly ahead of your hands.

Swap for: Incline Push-Up, Close-Grip Push-Up, Band-Assisted Push-Up

Trunk and back

No equipment is needed to train the trunk well. Each of these holds the spine still or lifts it gently, and each has an easier and harder version.

Abs, lying

Dead Bug

Abs

Lying on your back, moving opposite arm and leg while your back stays down trains the trunk with no strain on the neck. It is easy to scale by moving only the legs.

How to do it

  1. Lie face up, arms pointing up and knees bent at right angles over your hips.
  2. Press your lower back into the floor.
  3. Reach one arm overhead and the opposite leg out long, both hovering above the floor.
  4. Bring them back and repeat with the other pair.

Cues

  • Back glued down
  • Breathe out as you reach
  • Opposite arm and leg

Common mistakes

  • Letting the back arch when the leg goes long: reach less far.
  • Going fast: each rep should take about three seconds.

Swap for: Plank, Alternating Leg Raise

Trunk, front hold

Plank

Abs

The plank asks your whole trunk to hold you straight. Start with hands on a counter, then a chair seat, then forearms on the floor, the same ladder as the push-up.

How to do it

  1. Set your forearms under your shoulders and your feet behind you, body in a straight line.
  2. Squeeze your glutes and pull your ribs down toward your hips.
  3. Hold, breathing normally, without letting your hips sag or rise.
  4. For the harder version, reach one arm forward and lift the opposite foot, hold, then switch sides.

Cues

  • Ribs down
  • Glutes tight
  • Straight line

Common mistakes

  • Hips sagging toward the floor: that hangs on your lower back.
  • Holding for minutes at an easy level: make it harder instead.

Swap for: Long Lever Plank, Plank Shoulder Tap

Obliques, side hold

Side Plank

Abs

The side plank trains the sides of the trunk that keep you upright when you stand on one leg or carry something in one hand. Knees down to start.

How to do it

  1. Lie on one side with your elbow under your shoulder and your legs stacked.
  2. Lift your hips until your body is straight from head to feet.
  3. Hold, then switch sides.

Cues

  • Hips high
  • Stacked feet
  • Elbow under shoulder

Common mistakes

  • Letting the hips drop toward the floor as the hold goes on.
  • Rolling the chest forward or back.

Swap for: Dumbbell Side Plank, Copenhagen Plank

Lower back, lying lift

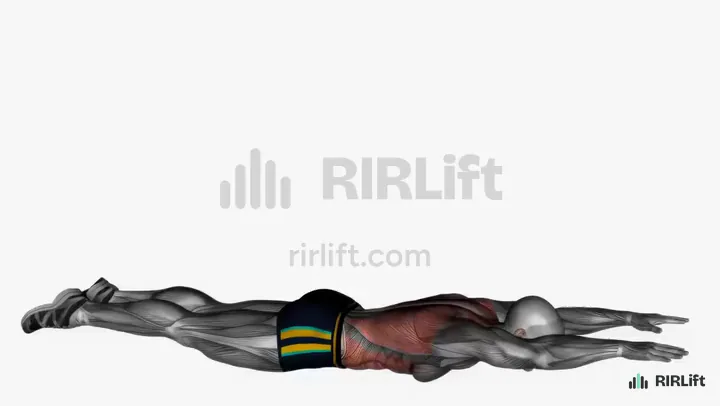
Superman

Lower Back

Lifting arms and legs gently off the floor while lying face down works the back muscles that keep you from stooping. A few inches of lift is all it takes.

How to do it

  1. Lie face down with your arms stretched overhead and legs straight.
  2. Raise arms, chest and legs a few inches off the floor together.
  3. Hold for a second, then lower everything together.

Cues

  • Long, not high
  • Eyes on the floor

Common mistakes

  • Cranking the head back to lift higher: keep your neck in line with your spine.

Swap for: Back Extension, Exercise Ball Back Extension, Band Good Morning

Put them together: example sessions

Each session below picks from the exercises above for one situation, with the sets, reps, rest and RIR filled in.

Session 1

Three short sessions a week at home

  • Workouts3× a week
  • Working sets30 a week
  • Per workout~25 min
  • EquipmentBodyweight

You want to start strength training with no equipment, and short sessions on alternate days suit your week.

Five exercises, 2 sets each, three days a week gives legs, hips, chest, trunk and calves 6 sets each, 30 working sets a week. Short sessions on alternate days are easier to keep up than long ones, and each set ends with 2 or 3 reps left so soreness stays low.

Full body
ExerciseSets × repsRIRRest
Bodyweight SquatTouch a chair at the bottom. 2 × 8–15 3 75 s
Incline Push-UpHands on a counter. 2 × 8–12 2 75 s
Standing Side Leg RaisePer leg. 2 × 10–12 2 1 min
Single-Leg Calf RaisePer leg. 2 × 8–15 2 1 min
Dead BugPer side. 2 × 6–10 3 1 min
How to run it
Spread it over three days with a rest day after each, for example Monday, Wednesday and Friday. Each session takes about 15 minutes.
How to progress
Add 1 or 2 reps each week. When a set reaches the top of the range with reps to spare, use the harder version: a lower chair, a lower push-up surface, straighter legs on the dead bug.

Session 2

Everything standing, no floor work

  • Workouts2× a week
  • Working sets24 a week
  • Per workout~25 min
  • EquipmentBodyweight

Getting down to the floor and back up is hard, and you want a bodyweight routine you can do in the kitchen.

Five standing exercises work the legs, hips, chest and calves with 12 working sets per session, 24 a week over two days. The one-leg side raises and calf raises make your trunk hold you steady on one foot, so balance gets trained without any floor work.

Standing session
ExerciseSets × repsRIRRest
Bodyweight SquatSit down to a chair. 3 × 8–12 3 90 s
Incline Push-UpHands on the counter. 3 × 8–12 2 75 s
Wall SitSeconds per hold. 2 × 15–30 2 75 s
Standing Side Leg RaisePer leg. 2 × 10–12 2 1 min
Single-Leg Calf RaisePer leg. Hold the counter. 2 × 8–12 2 1 min
How to run it
Do it twice a week at the kitchen counter, two or three days apart. Keep a chair behind you for the squats.
How to progress
Add reps first. Then make each exercise harder: a lower chair, a lower push-up surface such as a sturdy table, a deeper wall sit, and less hand support on the leg raises and calf raises.

Session 3

Already active, ready for harder versions

  • Workouts2× a week
  • Working sets23 a week
  • Per workout~25 min
  • EquipmentBodyweight

You walk or play a sport regularly, the easy versions feel light, and you want bodyweight training that still challenges you.

Two sessions, 10 to 13 sets each, use the harder versions of each exercise: deeper and slower squats, kneeling push-ups, side planks and floor work. That is about 23 working sets a week, still ending each set with 2 reps in reserve.

Day A
ExerciseSets × repsRIRRest
Bodyweight Squat3 seconds down. 3 × 12–20 2 90 s
Kneeling Push-Up 3 × 6–12 2 90 s
Side PlankSeconds per side. 2 × 20–40 2 1 min
Donkey KickPer leg. 2 × 12–15 2 1 min
Day B
ExerciseSets × repsRIRRest
Wall SitSeconds per hold. 3 × 30–45 2 90 s
PlankSeconds per hold. 3 × 20–40 2 1 min
SupermanHold 2 seconds at the top. 2 × 10–12 2 1 min
ClamshellPer side. 2 × 15–20 2 1 min
Single-Leg Calf RaisePer leg. 3 × 10–15 2 1 min
How to run it
Do Day A and Day B once each a week, two or three days apart. Take 3 seconds to lower on every squat and push-up; slowing down is how bodyweight work keeps getting harder.
How to progress
Add reps until the top of the range, then progress the version: full push-ups after 12 kneeling ones, a straight-leg side plank after 30 seconds on the knees, a 3-second pause at the bottom of the squat.

Make it fit you

Questions

What are the only 5 bodyweight exercises seniors need?

A squat to a chair, an incline push-up, a side leg raise, a calf raise and a dead bug. Together they train legs, upper body, hips and trunk, which is what the three-day plan on this page uses.

What is the quickest way for elderly people to regain muscle?

Strength training two or three times a week with sets that end close to failure, plus enough protein in your meals. Bodyweight exercises are a good start; add weight once they become easy.

What are easy exercises seniors can do every day?

Squats to a chair, counter push-ups, calf raises holding the counter and side leg raises can be done most days in a few minutes. Keep at least 2 reps in reserve if you do them daily.

Can you build muscle with bodyweight exercises after 60?

Yes, as long as the exercise is hard enough that the last few reps are a real effort. When an exercise passes about 20 reps, move to a harder version rather than doing more.

How long should a bodyweight workout for seniors take?

Fifteen to thirty minutes is enough. The plans here take about 15 minutes for the three-day routine and 25 to 30 for the harder two-day one.