Exercises for a smaller waist: core, shoulders, back and glutes

The best exercises for a smaller waist are core holds that keep your midsection tight, such as the plank, side plank, dead bug, Pallof press and ab wheel rollout, plus lifts that build the frame around your waist: the lat pulldown, one-arm row and lateral raise for your back and shoulders, and the hip thrust and abduction machine for your glutes. The tape measure only drops with overall fat loss; wider shoulders and fuller hips make the same waist look smaller next to them. Train 2 or 3 days a week.

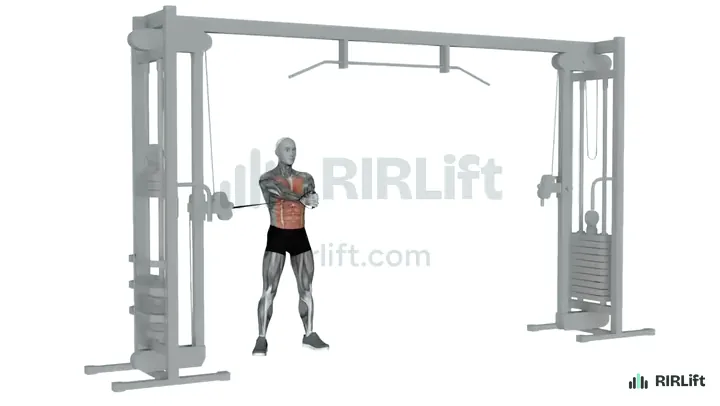
  1. Pallof Press Abs
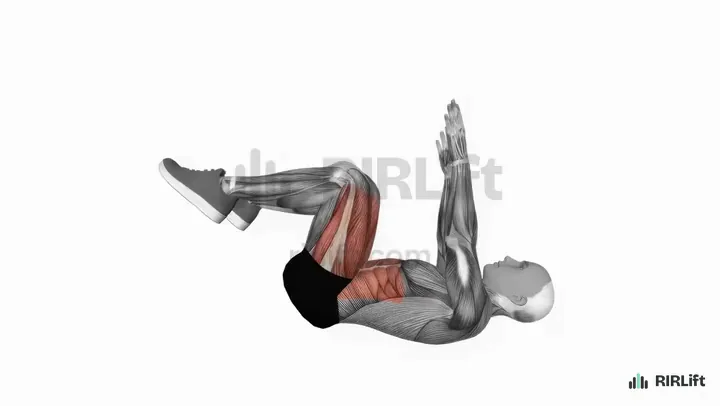
  2. Dead Bug Abs
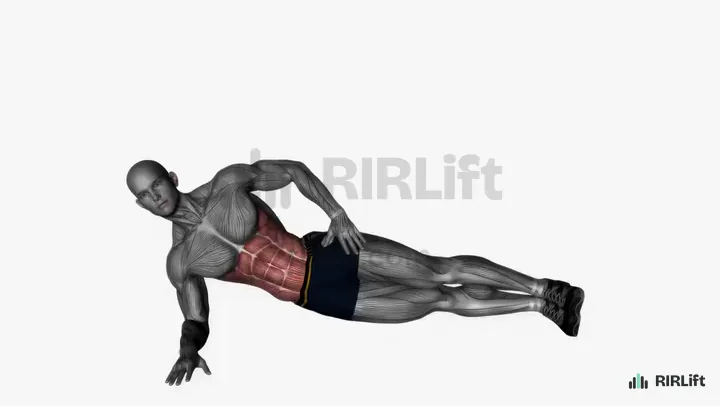
  3. Side Plank Abs
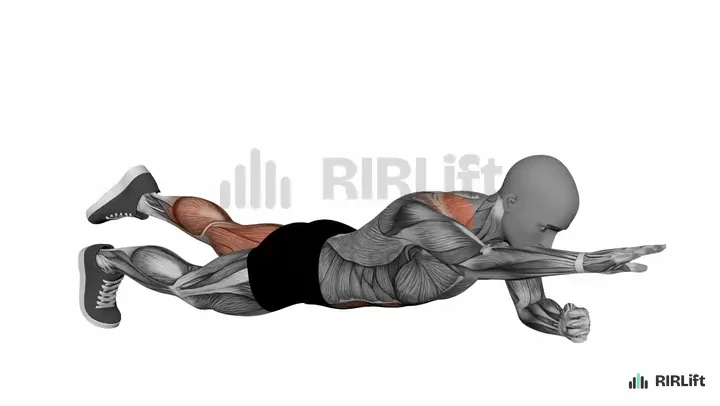
  4. Plank Abs
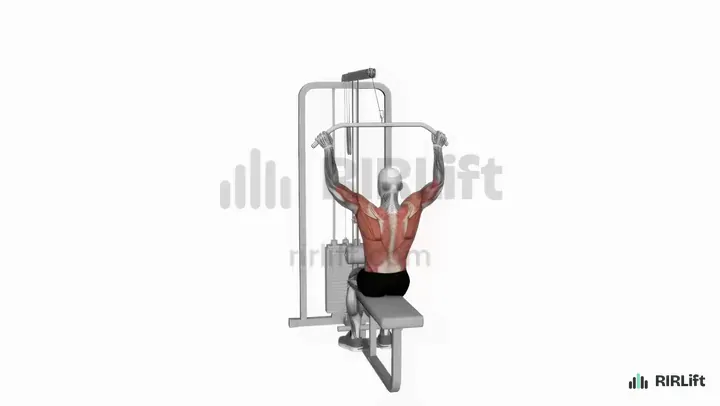
  5. Lat Pulldown Lats
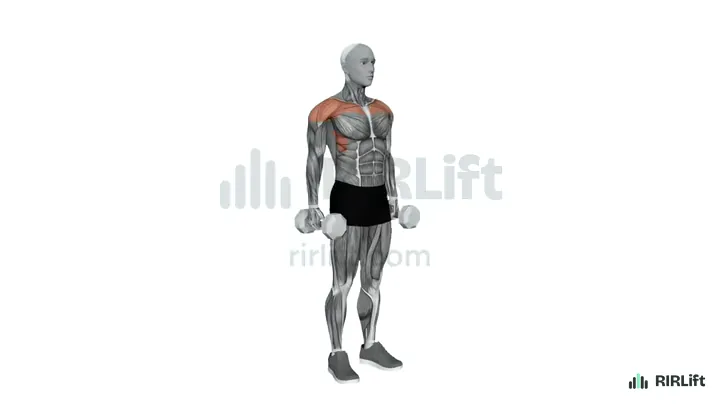
  6. Dumbbell Lateral Raise Shoulders
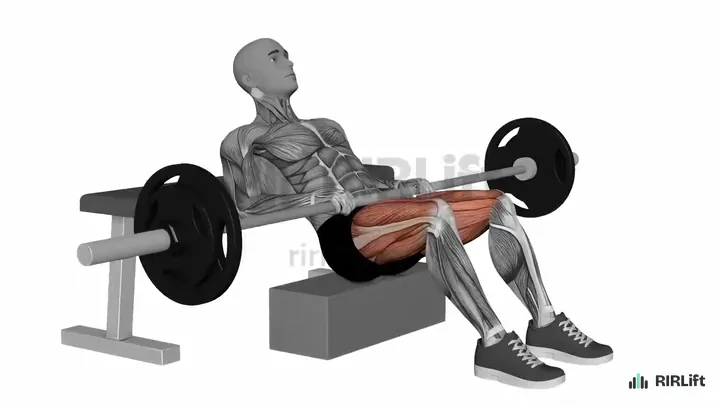
  7. Hip Thrust Glutes
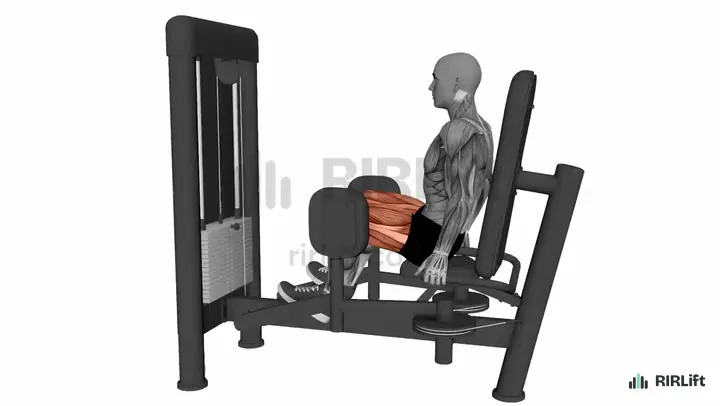
  8. Hip Abduction Machine Abductors
Core holds

Holds train every layer of your midsection, deep muscles included, by making it stay still while you breathe. They suit a waist goal because they build control without loading the sides of your trunk heavily.

Abs, front hold

Plank

Abs

The plank teaches you to brace your whole midsection with your ribs pulled down, the same tightness you use under every heavy lift. It needs nothing but floor space.

How to do it

  1. Set your forearms under your shoulders and your feet behind you, body in a straight line.
  2. Squeeze your glutes and pull your ribs down toward your hips.
  3. Hold, breathing normally, without letting your hips sag or rise.
  4. For the harder version, reach one arm forward and lift the opposite foot, hold, then switch sides.

Cues

  • Ribs down
  • Glutes tight
  • Straight line

Common mistakes

  • Hips sagging toward the floor: that hangs on your lower back.
  • Holding for minutes at an easy level: make it harder instead.

Swap for: Long Lever Plank, Plank Shoulder Tap

Obliques, side hold

Side Plank

Abs

Holding a side plank works the obliques by keeping you straight, not by bending you, which trains the sides of your waist without loading them heavily. Hold for time and add seconds each week.

How to do it

  1. Lie on one side with your elbow under your shoulder and your legs stacked.
  2. Lift your hips until your body is straight from head to feet.
  3. Hold, then switch sides.

Cues

  • Hips high
  • Stacked feet
  • Elbow under shoulder

Common mistakes

  • Letting the hips drop toward the floor as the hold goes on.
  • Rolling the chest forward or back.

Swap for: Dumbbell Side Plank, Copenhagen Plank

Deep abs, anti-extension

Dead Bug

Abs

Reaching an arm and the opposite leg away while your lower back stays flat trains the deep abdominal muscles to keep your belly in under movement. It is the first core move to learn on this page.

How to do it

  1. Lie face up, arms pointing up and knees bent at right angles over your hips.
  2. Press your lower back into the floor.
  3. Reach one arm overhead and the opposite leg out long, both hovering above the floor.
  4. Bring them back and repeat with the other pair.

Cues

  • Back glued down
  • Breathe out as you reach
  • Opposite arm and leg

Common mistakes

  • Letting the back arch when the leg goes long: reach less far.
  • Going fast: each rep should take about three seconds.

Swap for: Plank, Alternating Leg Raise

Resisting rotation and arching

The Pallof press asks your core to stop a cable from turning you, and the ab wheel asks it to stop your lower back from arching. Both are harder than holds and both can be progressed for months.

Obliques and deep abs, anti-rotation

Pallof Press

Abs

Pressing a cable handle straight out while it tries to turn you trains the obliques to hold rather than twist. You can load it heavy and it still keeps the waist work controlled.

How to do it

  1. Set a cable at chest height, stand side-on to it and grip the handle two-handed at your chest.
  2. Step away until the cable pulls, feet hip-width.
  3. Press the handle straight out, hold for two seconds without turning, then bring it back.

Cues

  • Hands on the midline
  • Don't turn
  • Hold it out

Common mistakes

  • Standing too close, so the cable barely pulls.
  • Letting the arms drift toward the stack.

Swap for: Cable Woodchop, Landmine Twist

Abs, anti-extension

Ab Wheel Rollout

Abs

Rolling out and back makes your abs stop your lower back from sagging under a long lever. It is one of the hardest core exercises you can do from your knees.

How to do it

  1. Kneel with the wheel under your shoulders and your arms straight.
  2. Brace and roll forward, letting your hips follow, until just before your back starts to sag.
  3. Pull the wheel back to your knees using your abs, not your hips.

Cues

  • Tuck the pelvis
  • Roll only as far as you own
  • Arms straight

Common mistakes

  • Letting the lower back cave at the far end.
  • Sitting the hips back first on the return instead of pulling with the abs.

Swap for: Stability Ball Body Saw, Plank

Back and shoulders that frame the waist

A waist looks smaller next to a wider upper body. The lat pulldown and row build the back muscles that flare out under your arms, and lateral raises and presses build the side of the shoulder, which widens your silhouette at the top.

Lats, vertical pull

Lat Pulldown

Lats

The lats are the wide back muscles that give your upper body its V shape. Building them is one of the most direct ways to make your waist look narrower by comparison.

How to do it

  1. Set the thigh pad so your legs are locked under it, then stand up and take the bar a little wider than your shoulders, palms forward.
  2. Sit down with your arms fully stretched overhead and lean back only slightly.
  3. Pull the bar to your upper chest by driving your elbows down toward your hips.
  4. Let the bar rise until your arms are straight and your shoulders lift toward your ears, then pull again.

Cues

  • Elbows to your back pockets
  • Bar to the top of the chest
  • Let the stack lift you at the top

Common mistakes

  • Leaning far back and rowing the bar to your stomach: stay nearly upright so it remains a vertical pull.
  • Stopping with the arms still bent at the top: the stretch overhead is half of what makes the pulldown work.

Swap for: Assisted Pull-Up, Single-Arm Lat Pulldown, One-Arm Dumbbell Row

Lats and upper back, one-arm row

One-Arm Dumbbell Row

Lats, Upper Back

The row builds the same back muscles as the pulldown with one dumbbell and a bench, so it is the home option for the back.

How to do it

  1. Put one hand and the same-side knee on a bench, or your hand on a chair seat with both feet on the floor, so your back is flat.
  2. Hold a dumbbell in the other hand with your arm hanging straight.
  3. Pull your elbow back toward your hip until the dumbbell reaches your ribs.
  4. Lower it until your arm is straight again, finish all reps, then switch sides.

Cues

  • Elbow to your hip
  • Back flat as a table
  • Full stretch at the bottom

Common mistakes

  • Twisting your chest open to lift the dumbbell higher: keep both shoulders level.
  • Shrugging the shoulder up toward your ear: pull the elbow back, not the shoulder up.

Swap for: Band Bent-Over Row, Dumbbell Bent-Over Row, Seated Cable Row

Side delts, lateral raise

Dumbbell Lateral Raise

Shoulders

Side delts set the width of your shoulders. Even a small amount of extra muscle there changes how your waist looks in a fitted top.

How to do it

  1. Pick light dumbbells you can raise for 12 clean reps, and stand with your feet hip width apart, the weights hanging by your thighs.
  2. Lean your chest forward a few degrees, pull your shoulders down away from your ears and soften your elbows.
  3. Sweep the weights out and slightly forward, leading with your elbows, until your upper arms are level with your shoulders.
  4. Hold that top position for a beat, then take two to three seconds to lower until the dumbbells are a hand's width from your thighs.
  5. Start the next rep from there without resting at the bottom or bouncing out of it.

Cues

  • Elbows lead, hands follow
  • Shoulders down, neck long
  • Push the weights out, not up

Common mistakes

  • Shrugging the weight up: if your shoulders rise toward your ears, drop to lighter dumbbells and stop each rep where your upper arm is level.
  • Swinging the torso to start each rep: brace, stand still and keep the first inch of the lift as slow as the rest.
  • Bending the elbows more and more as the set goes on: set the bend on rep one and keep it, or the lever shortens and the set gets easier without you noticing.

Swap for: Cable Lateral Raise, Band Lateral Raise, Machine Lateral Raise

Shoulders, overhead press

Dumbbell Shoulder Press

Shoulders

The press loads the shoulders heavier than any raise and trains them with the triceps. It adds the size that raises then shape.

How to do it

  1. Set a bench upright or one notch back from vertical, sit with your feet flat, and rest a dumbbell on each thigh.
  2. Kick one knee up at a time to bring the dumbbells to shoulder height, then set your back against the pad.
  3. Turn your elbows slightly forward so they sit a little in front of your torso, palms facing forward or angled in.
  4. Drive both weights overhead on a slight inward arc until your elbows are straight, keeping your ribs down and your back on the pad.
  5. Lower slowly until the dumbbells are around ear height or a bit below, then press again.

Cues

  • Ribs down, back on the pad
  • Elbows a little forward
  • Press up and slightly in

Common mistakes

  • Arching your lower back off the pad to finish reps: that turns it into an incline press, so lighten the weight and keep your ribs stacked over your hips.
  • Flaring the elbows straight out at shoulder height: bring them a little forward so the shoulder joint stays comfortable at the bottom.
  • Stopping each rep well above your ears: lower to around ear height so the delts work through a full range.

Swap for: Machine Shoulder Press, Arnold Press, Pike Push-Up

Glutes and hips

Rounder glutes and fuller upper hips do the same thing at the bottom of the waist. Hip thrusts and bridges build the main glute muscle, and the abduction machine builds the upper side of the hip.

Glutes, loaded hip extension

Hip Thrust

Glutes

The hip thrust loads the glutes harder at the top than any other lift, so it is the most direct way to build the curve below your waist.

How to do it

  1. Sit with your shoulder blades against the long side of a flat bench and roll a padded bar over your hips.
  2. Plant your feet flat about hip width apart, close enough that your shins are vertical at the top.
  3. Drive through your heels and lift your hips until your torso and thighs form a straight line.
  4. Hold the top for a second with your chin tucked, then lower your hips most of the way down and repeat.

Cues

  • Chin tucked, ribs down
  • Shins vertical at the top
  • One-second squeeze

Common mistakes

  • Arching your lower back to get higher: stop when your hips are level with your knees and squeeze your glutes there.
  • Feet too far out, which turns it into a hamstring exercise: bring them in until your shins are vertical at lockout.

Swap for: Dumbbell Hip Thrust, Smith Machine Hip Thrust, Dumbbell Glute Bridge

Glutes, floor bridge

Dumbbell Glute Bridge

Glutes

The bridge is the home version of the hip thrust, done flat on the floor with a dumbbell on your hips. It is easy to set up and easy to progress.

How to do it

  1. Lie face up, knees bent, heels about a foot from your hips.
  2. Place a dumbbell across your hips and hold the ends.
  3. Press through your heels and lift your hips until your body makes a straight line from knees to shoulders.
  4. Hold the squeeze for a second at the top, lower until your glutes lightly reach the floor, and repeat.

Cues

  • Heels, not toes
  • Squeeze before you lower
  • Short range, hard squeeze

Common mistakes

  • Pushing off the toes so the thighs burn instead of the glutes: lift your toes slightly if it helps you feel the heels.
  • Bouncing off the floor between reps: let the hips touch down and pause.

Swap for: Dumbbell Hip Thrust, Single-Leg Glute Bridge, Dumbbell Staggered Hip Thrust

Upper glutes, hip abduction

Hip Abduction Machine

Abductors

Pushing your knees apart against the pads trains the upper glutes on the side of the hip, the part that widens your hips just below the waist.

How to do it

  1. Sit with the outside of your knees against the pads and set the start so your legs are close together.
  2. Lean your torso forward slightly and hold the handles.
  3. Push your knees apart as far as the machine allows.
  4. Pause at the widest point, return slowly without letting the stack touch, and repeat.

Cues

  • Lean forward a little
  • Pause at the widest point
  • Do not let the plates rest

Common mistakes

  • Bouncing the pads out and letting them slam back: count two seconds on the way in.
  • Using so much weight that the range shrinks to a few inches: full range with less load works better.

Swap for: Lateral Band Walk, Band Seated Hip Abduction, Standing Side Leg Raise

Put them together: example sessions

Each session below picks from the exercises above for one situation, with the sets, reps, rest and RIR filled in.

Session 1

At home with dumbbells, two days

  • Workouts2× a week
  • Working sets28 a week
  • Per workout~30 min
  • EquipmentDumbbells

You exercise at home with dumbbells and a mat, and you want a smaller-looking waist from two sessions a week.

Each session has one back move, one shoulder move, one glute move and two core moves, about 14 sets. Over the week your back and glutes get 6 sets each, your shoulders 6, and your core 10, which is enough to change shape while leaving room for walking or other training.

Session A
ExerciseSets × repsRIRRest
Dumbbell Glute Bridge1 warm-up set firstPause 1 s at the top. 3 × 12–20 1 90 s
One-Arm Dumbbell RowPer arm. 3 × 10–15 1 75 s
Dumbbell Lateral Raise 3 × 12–20 1 1 min
Dead BugPer side. 3 × 8–12 2 45 s
Side PlankSeconds per side. 2 × 20–45 2 45 s
Session B
ExerciseSets × repsRIRRest
Dumbbell Shoulder Press1 warm-up set first 3 × 8–12 2 90 s
One-Arm Dumbbell RowPer arm. 3 × 10–15 1 75 s
Dumbbell Glute Bridge 3 × 15–25 1 75 s
PlankSeconds per hold. 3 × 20–45 2 45 s
Dead BugPer side. 2 × 8–12 2 45 s
How to run it
Do one session early in the week and the other late, such as Monday and Thursday.
How to progress
For lifts, keep the weight until each set reaches the top of its range with the reps in reserve listed, then move up. For holds, add 5 seconds a week up to the top of the range, then switch to a harder version.

Session 2

Gym, upper and lower days

  • Workouts4× a week
  • Working sets46 a week
  • Per workout~30 min
  • EquipmentLat Pulldown, Dumbbells, Adjustable Cable, Barbells +3

You train in a gym with cables and machines three or four times a week, and you want your training to build the hourglass shape directly.

Upper days build the back and shoulders and finish with an anti-rotation move; lower days build the glutes and finish with a core hold or rollout. Across a four-day week your back gets 6 sets, your shoulders and glutes 12 each and your core 16, without heavy side bends or loaded twists.

Upper
ExerciseSets × repsRIRRest
Lat Pulldown1 warm-up set first 3 × 8–12 2 2 min
Dumbbell Shoulder Press1 warm-up set first 3 × 8–12 2 2 min
Dumbbell Lateral Raise 3 × 12–20 1 1 min
Pallof PressPer side. Hold 2 s. 3 × 10–12 2 1 min
Lower
ExerciseSets × repsRIRRest
Hip Thrust2 warm-up sets first 3 × 8–12 2 2 min
Hip Abduction Machine 3 × 12–20 0 1 min
Ab Wheel RolloutFrom the knees. 3 × 6–12 2 75 s
Side PlankSeconds per side. 2 × 30–45 2 45 s
How to run it
Alternate Upper and Lower, ideally Upper, Lower, rest, Upper, Lower. If you only have three days, rotate through them so each day comes up three times every two weeks.
How to progress
Add load once every set fills the range at its target reps in reserve. On the Pallof press, stand further from the stack before adding a plate. Log your reps in reserve so RIRLift can set the next session's weight.

Session 3

You already train and want a 10-minute waist finisher

  • Workouts3× a week
  • Working sets24 a week
  • Per workout~15 min
  • EquipmentAdjustable Cable, Ab Wheel

You already lift or run, you have gym access, and you want short core sessions added to the end of your existing training.

Ten minutes, three times a week, gives your core about 24 sets of controlled work across holds, anti-rotation and rollouts. It is enough to see your core strength climb without eating into the training you already do.

Finisher A
ExerciseSets × repsRIRRest
Pallof PressPer side. Hold 2 s. 3 × 10–12 2 45 s
Dead BugPer side. 3 × 8–12 2 45 s
Side PlankSeconds per side. 2 × 30–45 2 30 s
Finisher B
ExerciseSets × repsRIRRest
Ab Wheel RolloutFrom the knees. 3 × 6–12 2 1 min
PlankSeconds per hold. 3 × 30–60 2 45 s
Pallof PressPer side. 2 × 10–12 2 45 s
How to run it
Add Finisher A or B to the end of three of your existing sessions, alternating them.
How to progress
Add seconds to holds and reps to rollouts each week. When a hold passes 45 seconds, make it harder: lift the top leg on side planks, reach one arm forward on planks.

Make it fit you

Questions

How can I slim my waist in 2 weeks?

Two weeks is not enough to lose much fat or build visible muscle. Use them to start the plan and a small calorie deficit; the change in your waist measurement and shape shows over two to three months of steady work.

How do I reduce the size of my waist?

The measurement comes down as you lose body fat overall. Train your core with holds and anti-rotation work, build your back, shoulders and glutes so your waist looks narrower in proportion, and eat a little less than you burn.

Do side bends and twists make your waist bigger?

Heavy weighted side bends and twists build the obliques, the muscles on the sides of your waist, like any loaded exercise builds muscle. Light or bodyweight versions will not change much. If a smaller waist is the goal, holds and anti-rotation moves do the core work without adding load to the sides.

How do I get a tiny waist and a flat stomach?

Lower your body fat, train your abs two or three times a week with holds and rollouts, and build your shoulders and glutes. The proportions are as much about what is above and below your waist as the waist itself.