
Blog
Deadlift Stance: How Wide, How Far Out, and Where the Bar Goes
Published November 12, 2026 · 15 min read
For a conventional deadlift, start with your feet about hip width apart, toes forward or turned out slightly, and the bar over the middle of your foot, about an inch from your shins. Then adjust from there: a little wider or more turned out if your hips, build or sticking point call for it. The fastest way to find your own number is the vertical jump test below, and the rest of this guide shows how to refine it and when to change it.
TL;DR
- Jump straight up, note where your feet land, and use that as your starting deadlift stance. It usually sits near hip width.
- Set the bar over midfoot, roughly 1 to 2 inches from your shins, with your weight spread across the whole foot.
- Conventional stances run between hip and shoulder width. Sumo is far wider, with the toes turned out about 40° to 45°.
- Change one thing at a time (width, then toe angle), and judge each change by bar path, back position and how the first inch of the pull feels.
- Log your sets with the stance you used, so you can tell whether a change helped.
Table of Contents
- Start with the vertical jump stance
- How wide is wide enough: the accepted range
- Where the bar goes relative to your feet
- Toe angle: small changes, real effects
- Adjusting width for your build
- Conventional versus sumo stance
- The staggered or B-stance deadlift
- Common stance mistakes and how to fix them
- Making the stance repeatable
- Tracking a stance change with RIRLift
- FAQ
- Sources
Start with the vertical jump stance
The most reliable starting point is not a measurement at all. Greg Nuckols at Stronger by Science suggests performing a vertical jump and noticing the stance you naturally gravitate toward, which typically lands around hip width. His reasoning is simple: in both a jump and a deadlift you are trying to push force straight down through the floor, and feet directly beneath your hips make that easiest.
The U.S. Marine Corps fitness guide for the conventional deadlift teaches the same idea, telling lifters to step up to the bar with feet directly under the hips in a vertical jump stance. That two independent sources land on the same cue says something about how well it works for beginners.
Try it this way:
- Stand relaxed, a few feet from the bar.
- Jump as if you were going for a high touch on a wall, without thinking about it.
- Look down. Your feet are now in a stance your body already considers strong.
- Walk up to the bar without changing that width, then check your toe angle.
If you want to train the jump itself as an accessory skill, the exercises for building a vertical jump share a lot with the deadlift, since both ask your legs to drive the floor away.
How wide is wide enough: the accepted range
There is no single correct number, but there is an accepted band. The ACSM Health & Fitness Journal's overview of the deadlift and its variations says a conventional deadlift places the feet between hip and shoulder width, toes forward or slightly outward. The American Council on Exercise gives the same range in its deadlift setup guidance, along with shins against the bar, a lifted chest and an over-under grip.
That gives you a practical rule of thumb:
| Stance | Feet position | Who tends to use it |
|---|---|---|
| Narrow conventional | About hip width, toes nearly straight | Most beginners, lifters who feel strongest at lockout |
| Mid conventional | Between hip and shoulder width, toes out slightly | Lifters with wider hips or a larger midsection |
| Wide conventional | Around shoulder width or a little beyond | Lifters who break the floor better with more leg drive |
Muscle & Fitness describes the same trade-off in its deadlift checklist: a narrower stance leans on the hamstrings and posterior chain, while a slightly wider conventional stance allows a bit more quad involvement. The article also makes the point that no width is perfect for everyone, because it depends on build, leverages and whether you are quad or hamstring dominant.
Where the bar goes relative to your feet
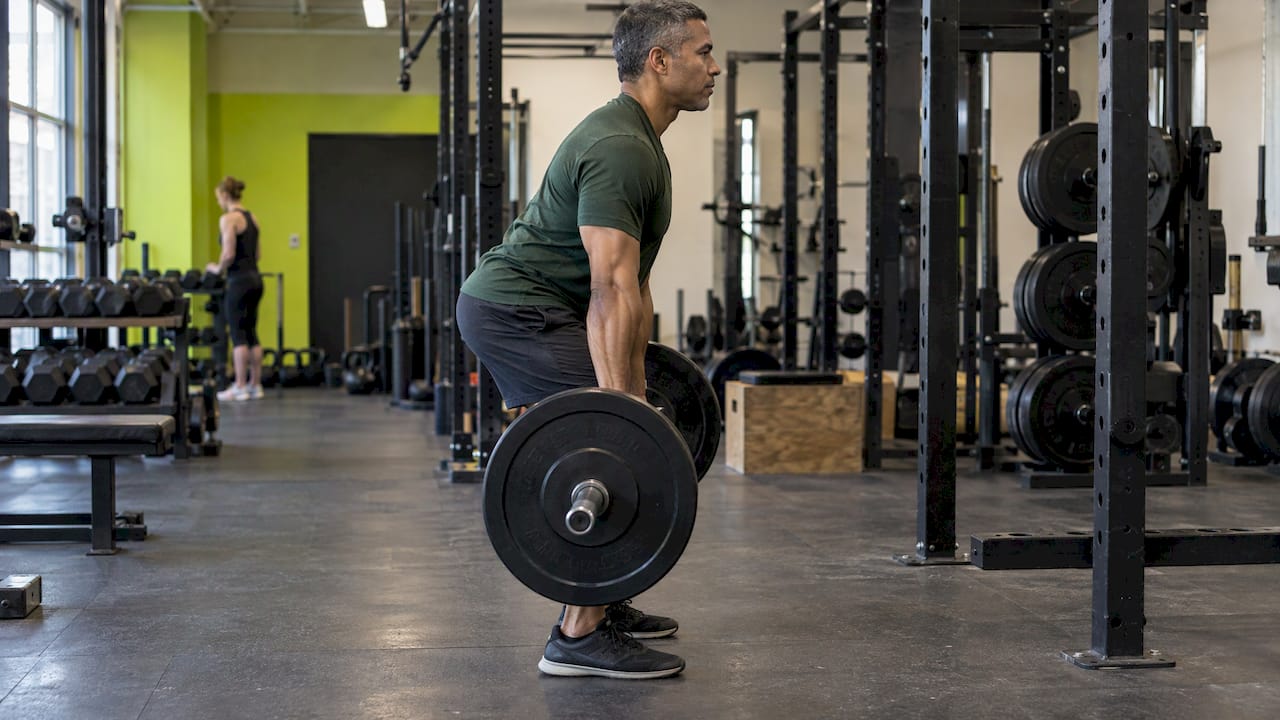
Stance width gets the attention, but the bar's position over your feet decides whether the stance works. The ACSM overview places the bar over the balls of the feet, about 1 to 2 inches from the vertical shin, with the shins staying vertical. The Marine Corps guide gives a visual cue: the bar sits directly above the first shoelace.
A simple check from the top down:
- Look down at your feet. The bar should appear to cut through the middle of your foot, not at your toes and not at your arches.
- Feel the floor. The Marine Corps guide describes three points of contact: the ball of the big toe, the ball of the pinky toe and the heel. All three stay pressed into the floor.
- Notice your shins. They should be close to the bar but not shoved into it. Nudge the bar forward and you lose position before the lift begins.
Muscle & Fitness frames it with two cues: internally, feel your whole foot, and externally, think of the bar over the laces. Both are the same idea from different angles.
Why balance across the foot matters
Nuckols explains what happens when the balance is off. If your weight sits too far back on your heels, it is hard to keep driving your shoulders back and your chest up. If it sits too far forward on the balls of your feet, you have to delay driving your hips forward, and your spine is more likely to flex. When a lift feels wrong right off the floor, the problem is often the pressure under your feet rather than the width.
Keep the bar on your legs
A good stance puts the bar on a short path. Strength Insider's form guide points out that the further the bar drifts from your legs, the longer the lever arm and the more stress lands on the lower back, which is why scrape marks on the shins are normal for a clean pull. If you notice the bar swinging forward as it leaves the floor, check whether you have set up with the bar too close to your shins or your hips too high before you touch the width.
Toe angle: small changes, real effects
Most lifters turn their toes out a little, and that is fine. The ACSM overview lists toes forward or slightly outward for conventional pulls. Within that range, there is a trade-off that Nuckols describes: turning your feet out a bit more helps you break the bar off the floor and generate speed at the start, while pointing them straighter ahead helps lockout strength.
It also changes how the knees travel. Your knees should track in line with your toes as you set your hips and push the floor away. If your knees cave inward or your arches collapse, you have either too much width for your hip mobility or too little toe-out, and you should widen your stance slightly or turn your toes out a few degrees before adding weight.
A quick experiment for toe angle
Use a light barbell and do three sets of five at each of these settings, resting a minute between them:
- Toes nearly straight
- Toes turned out roughly 15°
- Toes turned out roughly 30°
Pick the one where the bar leaves the floor most smoothly and your back stays flat without effort. Keep it for a few weeks before changing again.
Adjusting width for your build
Body proportions change the best stance. Nuckols notes that larger lifters with more of a midsection to fit between the thighs tend to pull with a slightly wider stance. Jake Boly adds that a wider conventional stance can help lifters with wider hips use their anatomy well, while a narrower stance, with feet closer to under the toes, is often the pick for recreational lifters because it stacks the lower body joints and gets more out of the quads when pushing the floor away.
A workable adjustment process:
- Start at your vertical jump width.
- If your knees get in the way of your arms or your hips feel pinched at the bottom, move your feet out an inch or two on each side and turn the toes out slightly.
- If you feel strong off the floor but stall near lockout, try bringing the feet in a little and pointing them straighter.
- Test any change at a weight you can pull for five clean reps. Do not test it on a max single.
The Manual's coverage of one coach's approach describes a hybrid "railroad" stance, with feet a couple of inches wider than shoulder width on each side and the arms inside the knees. It is one style among several, and it sits between a standard conventional pull and a sumo pull, so it is a reasonable experiment if neither extreme feels natural.
Posture while you adjust
Every stance change shifts where your hips and torso sit at the start, so watch your back position, not just your feet. If you want background on how alignment connects to long-term comfort, this overview of posture and long-term health is a good companion read. In the gym, the practical standard is a neutral spine from setup to lockout, with shoulders above hips and hips above knees at the start, as CrossFit's foundational guide describes it.
Warm up before you experiment. A short sequence of hinges, bracing and ramped sets makes new stances easier to judge, and a proper warm-up for deadlifts will tell you far more about a stance than a cold first set.
Conventional versus sumo stance
If you keep widening your stance and it keeps feeling better, you may be a sumo puller. The two styles differ in more than width.
| Feature | Conventional | Sumo |
|---|---|---|
| Feet | Hip to shoulder width | Wide, well outside the shoulders |
| Toes | Forward or slightly out | Turned out about 40° to 45° |
| Hands | Outside the knees | Between the knees |
| Torso | More forward lean | More upright |
The first three rows follow the ACSM overview, which also notes that conventional pulls require more forward trunk flexion while sumo uses a more erect back.
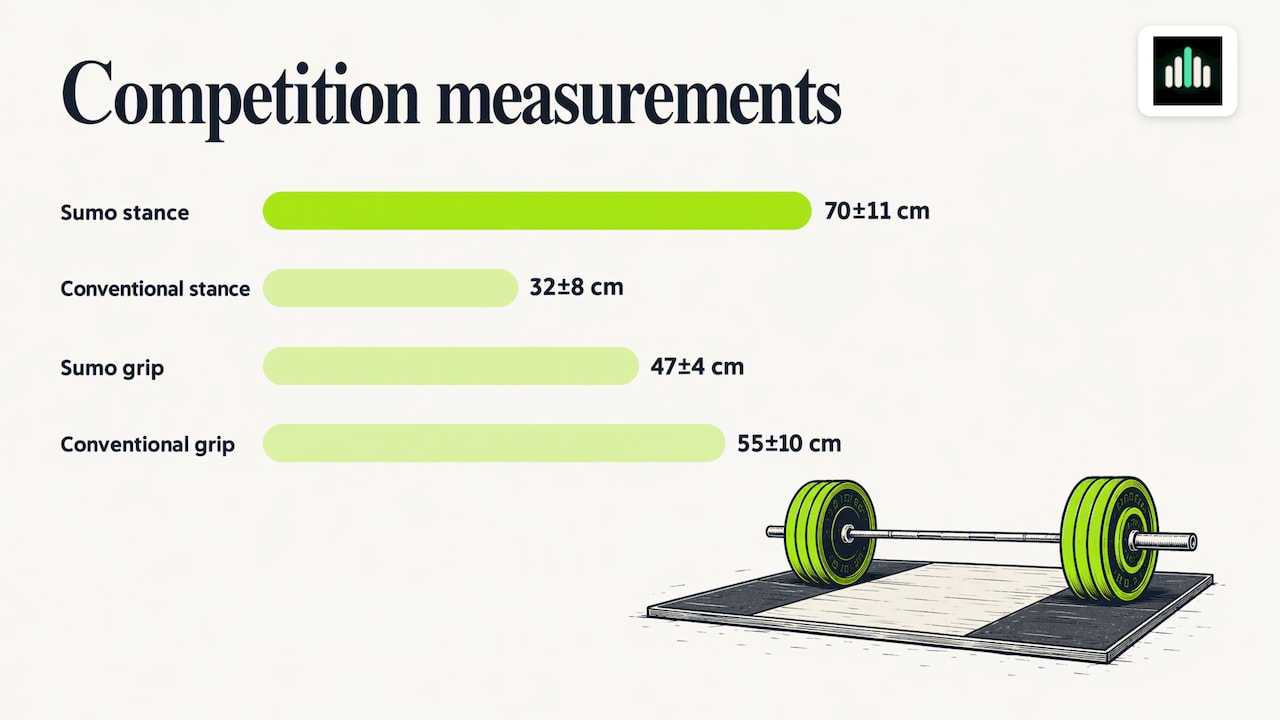
The measurements from competition are striking. In a biomechanical analysis at a national powerlifting championship, sumo lifters averaged a stance of 70 ± 11 cm against 32 ± 8 cm for conventional lifters, turned their feet out 42 ± 8 degrees against 14 ± 6, and gripped the bar with hands closer together (47 ± 4 cm against 55 ± 10 cm). The same study found that vertical bar distance, mechanical work and predicted energy expenditure were roughly 25% to 40% greater for the conventional group, which comes from the longer path the bar travels.
The point for you: a sumo stance is a different setup, not a wider version of a conventional one. If you want to try it, follow a dedicated guide to sumo deadlift form rather than just spreading your feet. Keep your conventional stance for your main pulls until you have spent several weeks on it.
The staggered or B-stance deadlift
The other stance people search for is the staggered one. PureGym describes the B-stance deadlift as an easier step toward the single-leg deadlift: the front leg does most of the work, and the back foot steps behind so its toes line up with or sit just behind the working foot's heel, with the heel lifted. ACE describes a similar offset-feet variation, with one heel even with the ball of the other foot, and says it trains the hips to produce force from varied positions that resemble real-life lifting.
This is an accessory movement for single-side strength and balance, not a replacement for your barbell stance. Use lighter loads than your two-footed pull and keep your hips level.
Common stance mistakes and how to fix them
- Feet too wide for your mobility. Your knees cave or your hips round. Bring the feet in an inch on each side and test again.
- Feet too narrow. Your knees block your arms or your hips shoot up first. This is what Tiger Fitness calls the "stripper deadlift" in its conventional deadlift coaching points: hips and chest need to rise together.
- Bar too far from the shins. The bar drifts forward and you chase it. Reset with the bar over midfoot, about an inch away.
- Weight on the toes or heels. Press through the whole foot and feel the three contact points.
- Changing everything at once. If you change width, toe angle and bar position in one session, you will not know which one helped.
Making the stance repeatable
A stance only helps if you can reproduce it. Mark where your feet land relative to the plates or the floor, use the same shoes, and take the same few seconds to set your feet before every pull. Then keep a record: the weight, the reps, and how many reps you had left, which is the number lifters call reps in reserve (RIR). When you change your stance, that history tells you whether the bar actually moved better at the same effort or just felt different. If you want to see whether your numbers are in a normal range, the deadlift standards page puts them in context, and the deadlift guide covers the lift from start to finish.
Tracking a stance change with RIRLift
If you want to find out whether a new stance is working, you need a record of every set. RIRLift lets you log weight, reps and reps in reserve for each set on your iPhone or Apple Watch, and its AI Coach analyzes your session logs to recommend your next load. That means a stance experiment shows up in your numbers instead of in your memory. The free plan covers core logging, and RIRLift Pro is $9.99 per month or $79.99 per year in the App Store for advanced coaching, analytics and unlimited routines. You can see both on the RIRLift home page.

For an Apple Watch lifter, the app also supports working out with only your watch, so your phone can stay in your bag while you set your feet and pull.
FAQ
What is the correct deadlift stance width?
For a conventional deadlift, anywhere between hip and shoulder width is accepted, with toes forward or slightly turned out. Begin with the stance you naturally land in after a vertical jump, then adjust an inch or two at a time based on how the bar leaves the floor and how your back holds position.
Should my toes point forward or out?
Slightly out is fine and common. Turning your feet out a little more can help you break the bar off the floor, while pointing them straighter ahead can help at lockout. Keep your knees tracking in line with your toes whichever angle you choose.
Is a wider stance always better for the deadlift?
Not automatically. A wider conventional stance suits some builds, especially wider hips or a larger midsection, but a narrower stance keeps the lower body joints stacked and works well for many lifters. Test your width at a manageable weight and keep the one that gives the cleanest bar path.
How far should the bar be from my shins?
About 1 to 2 inches, with the bar over the middle of your foot, roughly above the first shoelace. Your shins should stay vertical until you bend your knees to touch the bar, and the bar should stay close to your legs on the way up.
When should I use a staggered stance?
Use it as an accessory movement, not your main barbell pull. It builds single-leg strength and balance, with the front leg carrying most of the load and the back foot placed behind it for support.
Sources
- How to Deadlift: The Definitive Guide, Stronger by Science
- Understanding the Deadlift and Its Variations, ACSM Health & Fitness Journal
- A three-dimensional biomechanical analysis of sumo and conventional style deadlifts, PubMed
- How to Conventional Deadlift, U.S. Marine Corps MCCS
- The ACE Do It Better Series: The Deadlift
- Dumbbell Deadlift and Other Deadlift Variations, ACE
- The Ultimate Deadlift Checklist, Muscle & Fitness
- How to Find Your Optimal Deadlift Stance
- How to Do a Deadlift, The Manual
- How to Deadlift: Form Guide for Beginners, Strength Insider
- CrossFit: What Is a Deadlift?
- Conventional Deadlift Technique, Tiger Fitness
- How To Do B-Stance Deadlifts, PureGym